Lentil Bean Sprouts Salad

中文菜谱:扁豆小芽菜苗沙拉

I don’t really need to tell you bean sprouts are nutritious, healthy, and good for your body, do I?  I love to grow myself lentil bean sprouts at home.  All I need is quart size mason jars.  It is easy and fun to do so.

My sister and brother-in-law introduced black lentil bean sprouts to us when we were visiting them for thanksgiving holiday.  Black lentil bean sprouts taste better than the yellow one.  They are nutty, crunchy and very refreshing.  I love adding them to my salad, flat bread wraps and sandwiches.  They greatly improve the taste, texture and flavor. 

For each quart size mason jar (which you can buy from amazon),  I use 2 tablespoon black lentils. 

Soak them overnight. Drain well. Cover with cheesecloth or anything you have at hand that can let air in and out.

Rinse and drain the lentil beans once or twice per day.

You will see the sprouts in 2 to 3 days. 

In another 2 to 3 days, they grow longer and bigger.  

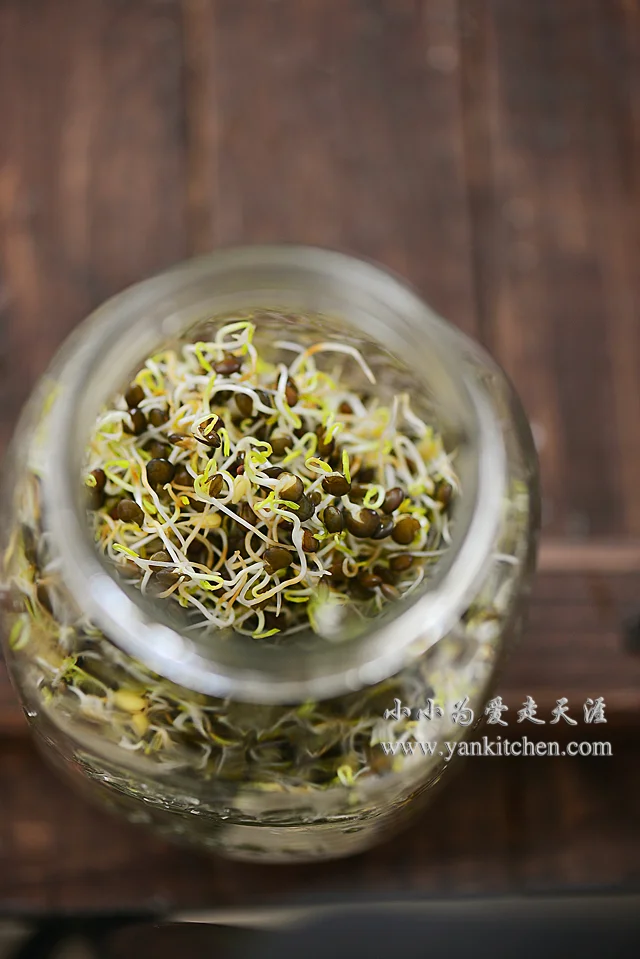
In about a week, you can harvest your very own lentil bean sprouts. 

I mostly use them in salad.

Ingredients:

1 tomato, sliced
romaine leaves
1 avocado
A handful lentil bean sprouts
dried cranberry
sliced almond


For salad dressing

2 tablespoon balsamic vinegar
1 and 1/2 tablespoon extra virgin olive oil
2 teaspoon honey
salt to taste
freshly ground black pepper


Directions

Combine balsamic vinegar, olive oil, honey, salt and black pepper in a bow.  Whisk until well mixed.

Remove avocado’s skin and core, dice avocado and cut or tear romaine leaves into bite size.

In a big plate, layer the tomato, romaine, avocado, lentil bean sprouts, dried cranberry and sliced almond. Sizzle with balsamic vinegar salad dressing.

Enjoy

Almond Milk

 中文菜谱:  生磨杏仁露

I don’t remember when exactly I became a fan of almond milk.  All I remember is that in college we pretty much ordered almond milk as our drinks every single time when my boyfriend took me out on dates. He now is my husband.  We still enjoy a cup of almond milk from time to time when cuddling on couch. 

Ingredients:

2/3 cup blanched almond (skinless almond would make better looking almond milk.  I am fine with whole one.)
2 toasted or pan roasted sweet rice
2 to 4 tablespoon sugar (or to personal taste)
1rolled oats (optional. It makes silkier, smoother almond milk )
3 cup water

Directions:

Soak almond and sweet rice in water for 20 to 30 minutes. 

Combine almond, sweet rice, sugar, rolled oats and water in vitamix.  

Turn it on, gradually raise speed from 1 to 10, and then grind at high speed for 5 minutes.  


In 5 minutes, you have hot tasty freshly made almond milk!

Enjoy!

Pork Dumplings with Garlic Chives

Dumplings are so widely popular in China that it becomes comfort food for many Chinese people.  Before the time food processor and stand mixer were introduced our daily lives, making dumplings was a time consuming chore.  My family made them only a couple times a year to celebrate important holidays.  The whole family gathered in the kitchen, kneading, chopping, mixing and wrapping the dumplings all together.  Ahhh, good old times.

Any other time of year, we can always buy dumplings from street food vendors or neighborhood dinners.   You can eat them as breakfast, lunch or dinner.  If you are served with dumplings when visiting a Chinese family, congratulations, you are highly welcomed in their home. 

With the help from meat grinder, stand mixer and pasta roller set, making fresh dumplings from scratch becomes easy and fun.   This time, I make traditional pork dumplings with garlic chives and then pan fry them.


For dumpling filling:

2/3 cup freshly ground pork
2 eggs
a handful fresh garlic chives
1 tablespoon soy sauce
1/3 teaspoon sugar
1/2 teaspoon oyster sauce
1/4  teaspoon ground white pepper
1/2  to 1 teaspoon rice cooking wine
a few drops sesame oil
salt to taste
2 to 3 tablespoon oil


For dumpling wraps:

1 cup bread flour
1/4 cup water
1/8 teaspoon salt
1/2 teaspoon oil


For pan frying dumplings:
3 to 4 tablespoon oil
1/2  to 3/4cup water
shopped green onion (optional)
white sesame (optional)


Directions:

Combine flour, water, salt and oil in a medium bowl.  Knead until a smooth dough ball forms.  It takes about 5 to 6 minutes.  Cover the dough with plastic wrap.  Let it rest for a couple hours.  If you are in a hurry, make sure the dough rest for at least 30 minutes. 

Add a pinch salt to eggs, make scrambled eggs over medium heat.  


Rinse the garlic chives thoroughly, pat dry and then chop them up.

Mix ground pork, soy sauce, ground white pepper, sugar, rice cooking wine, oyster sauce and sesame oil together.  Whisk with a pair chopsticks until all ingredients are well mixed. Add scrambled eggs and chopped chives, mix together. 

Add salt to taste. 

Feed the dough through pasta roller attachment to stand mixer at setting no. 1.  Repeat the folding and rolling on this setting for 5 to 6 times or until it reaches desired smoothness.  


Now roll the dough thinner at a narrower setting at 5

With a round shape cookie cutter, cut dumpling wraps.

Roll and fold the left over again to make more dumpling wraps.  The more times you roll it, the more elastic it gets.  I change the thickness setting to 6. 

Put a couple tablespoons pork filling to the center of dumpling wrap, lift from one end and then folding on both sides. 

I make 28 dumplings.  That is about 3 to 4 servings.

Heat a big flat nonstick pan over medium high heat.  Add oil, and then place dumplings one next to each other in the pan.  Fry or 1 minute, add water and cover.  Cook until water is almost gone, add green onion and white sesame, cover again and reduce to low heat.  

Cook until the dumpling bottoms are golden brown.  It is kind of tricky to get perfect crust on the bottom.  Too much heat, they burn; undercooked, they look pale instead of golden brown. 

So, my advice is to watch it closely at the end of cooking.

Time to enjoy O(_)O~

I like to pair pan fried dumplings with garlic chili sauce, which of course is home made too. I posted the recipe  before too:

http://www.yankitchen.com/blog/2k1o27b6fzy82wn0sphsah9oqd3hbo  (An English version recipe is coming soon.)

Take a bite

Love it

Oven roasted chestnut

中文菜谱: 烤栗子

When the fall came to the end, chestnut, one of my favorite nuts, appeared on local Saturday farmer’s market.  I have to buy several quarts of them whenever I see these cute brown color sweet nuts.  Right, that is how much I love them.

I was approached more than once by some curious American fellows asking me what they are and what they taste like.  Well, when toasted, chestnut tastes very much like butternut squash, but sweeter with firmer texture.  According to my standard, they are a hundred times better than butternut squash. 

When I was growing up, dried chestnut was a winter staple in my grandma’s pantry.  They are used in chicken soup, pork stew, even in porridge.  There are a thousand ways to cook chestnut and each single one of them is awsome.  

As for me, I always enjoy the freshly roasted ones the best.

It is a very simple and non-effort way.  Chestnuts are the only ingredient here.  We will also need a pair of sharp scissors and a toaster oven. 

Wash and drain the chestnuts.  Cut across the tops and be careful not to hurt yourself or cut the chestnuts into halves.  We just need a shallow cut so that they won’t explode when roasted in the oven.

Preheat the toaster oven to 350F. (Preheat to 375F if using a normal sized oven).

Spread out the chestnuts onto a cookie pan. Pop them in the oven and bake for 20 minutes. (Bake another 5 minutes if using a normal sized oven). 

These chestnuts I got from local farmer’s market are quite small.  Large size chestnuts might require additional 8 to 10 minutes baking time. 

Serve immediately right out of oven.  The cuts on chestnut tops will help to release the nuts from their shells. 

I’d rather have a bucket of these instead of popcorn when watching a movie and cozying up with my husband on the couch.  They taste so much better! 

Sponge cupcakes

中文菜谱: 海绵纸杯小蛋糕

The recipe is from http://forums.huaren.us/showtopic.aspx?topicid=1699462&forumpage=1, I make a little bit change, and they turn out great.  My thanks to dodorat , the author of this recipe. 

These wonderful little cakes are just like the cakes I used to buy from street vendors when I was a kid. 

Ingredients:

3 eggs
100 g granulated sugar
120 g cake flour
40 g whole milk
30 g vegetable oil
1/2 teaspoon vanilla exact
1/4 teaspoon salt


Direction;

Preheat oven to 375 F/ 190°C

Beat the eggs on high speed with stand mixer.  Add sugar little by little. 

My husband bought this mixer as a thanksgiving gift years ago.  It is the perfect gift.  Love it and it is still running great. 

Beat until egg mixture is very light and pale in color, double or triple in volume, around 6 to 9 minutes.

Shift cake flour and salt, and gently fold in with a rubble spatula. 

Combine milk, oil and vanilla exact; whisk together until well combined.  Take a couple scoops of batter, mix with milk mixture, and then add the milk mixture into big bowl of batter.  Fold in gently with a rubber spatula.

Line up the cupcake baking mold with paper cups.  Fill the cups with batter. 

Bake them for 14 to 16 minutes or until the tops are golden brown.  

They look just like the ones I used to buy from Chinese street vendors. 

The texture is great oo.