Spinach Noodles

中文: 菠菜面条

DSC_6450 2 copy.jpg

Spinach is a popular choice when it comes to natural colorful noodles.  I love using spinach in my noodles or spaghettis.  The color is always vibrant and beautiful.  And the best part is that there is food coloring involved!  It is totally natural. O(∩_∩)O~  

Ingredients:

2 cups bread flour
1/2  to 2/3 cup spinach puree*
1/4 teaspoon salt
1 teaspoon oil

*for spinach puree:
1 bag frozen spinach (12 oz), thawed
1 to 1 1/2 cups of water

Directions:

In a vitamix, add thawed spinach and water.  Blend at high speed until the spinach juice is really smooth.  I use vitamix because it does such a good job.  It is fine to use a regular blender too.  Just blend it a little longer. 

Measure the needed amount spinach puree.  Divide the rest into 3 to 4 Ziploc bags and freeze.  When you want to make spinach noodles again, just take out 1 bag and thaw.  How convenient is that! 

In a medium bowl, whisk together bread flour, spinach puree, oil and salt.  When everything starts to come together, knead with hands until the dough is smooth.

The dough might a little firm to knead.  That is ok. 

Wrap it up with plastic wrap.  Allow it to rest for a couple hours, or overnight.

With a rolling pin, roll the dough as flat as you can.

And then feed it through the pasta roller for KitchenAid stand mixer for several times.  At the one last time, set the thickness to 3.

DSC_6386 2 copy.jpg

I also make egg noodle dough sheets.  Don’t they look pretty already?

DSC_6390 2 copy.jpg
DSC_6395 2 copy.jpg

Remove the roller, and put on the spaghetti cutter .

Run the thin dough sheet through pasta cutter.

DSC_6414 2 copy.jpg

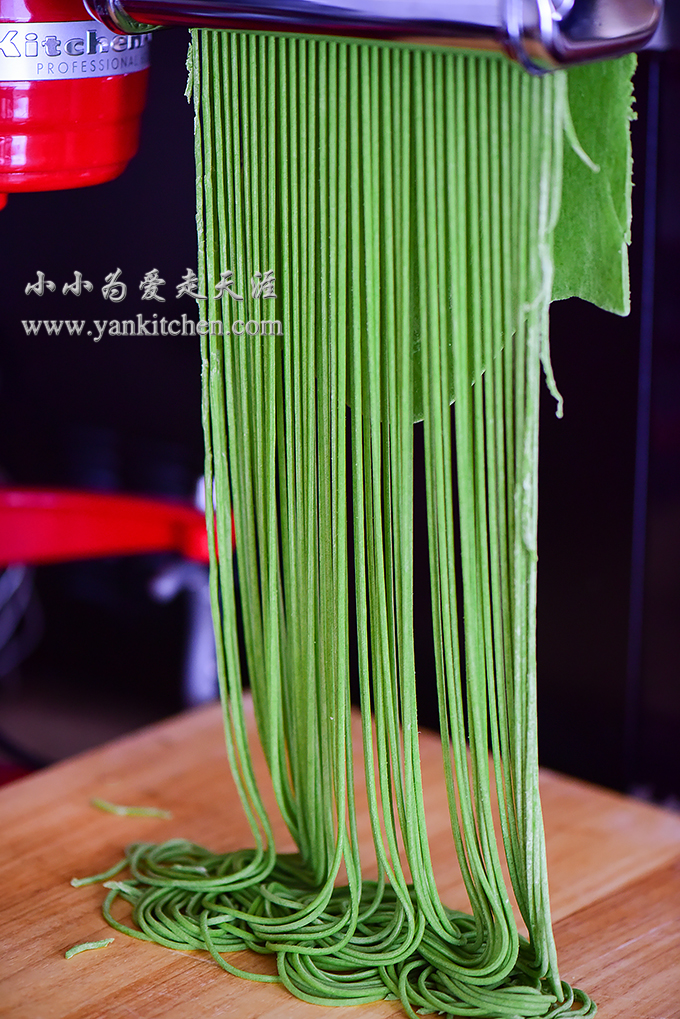
They are getting prettier.

DSC_6408 2 copy.jpg
DSC_6416 2 copy.jpg

Now you have freshly homemade spinach noodles!  You can cook them right away; or you can just freeze them for later use like I do.

DSC_6475 2 copy.jpg

Tiramisu 2

I finally found lady finger cookies on my last out of town grocery trip, hooray!  So I can make my beloved tiramisu again!

The lady finger cookies have finer texture.  They are crunchier and crispier than the cookie substitute I used before.  And they taste so much better this time.  So, my advice to you all, use the real lady finger cookies.  They make such a huge difference!

The tiramisu recipe is the same as I posted before with detailed step by step photos and instructions.


Ingredients:

8 oz mascarpone cheese
2 egg yolks
1 1/4 cup heavy cream
2 tablespoons rum and coffee liqueur (recommend Kahlua)
2 shots of espresso
1/3 to 1/2 cup sugar (use more if you have a sweet tooth)
18 to 20 lady finger cookies
1 teaspoon gelatin powder
2 to 3 tablespoonswater
unsweetened coco powder

Directions:

Get a 6 inch round or square cake pan ready.

Add egg yolks and half of the sugar to a double boiler bowl.  Beat the yolks and sugar until yolks turns creamy white color with electric mixer on medium low speed when the double boiler is simmering over low heat. 

Remove from heat and allow the yolks to cool a little bit.

In another medium bowl, add mascarpone cheese.  Beat with electric mixer until the cheese is smooth.  Add the cheese to yolk mixture.  Beat until well combined.

Sprinkle the gelatin powder over water in a bowl.  Let it sit for a couple minutes and then microwave it for 20 to 30 seconds or until it completely melts.  Cool until it is no longer too hot to touch.  Add to the yolk and cheese mixture.  Whisk until well combined. 

Replace the electric mixer with a clean pair of beaters. 

Beat the heavy cream in a medium bowl just until it begins to hold it shape.  Gradually add the other half of sugar in between.


With a rubber spatula or whisk, gently fold the whipped cream into yolk and cheese mixture.

 Mix rum and coffee liquor and espresso coffee in a small bowl or deep plate.  

Deep the lady finger cookies in the coffee mixture for a few seconds.  And then layer them at the bottom of glass cake pan.

DSC_5603 2 copy.jpg

Top with 1/3 cheese mixture and smooth it out with a spoon.  Add another layer of lady finger cookies. 

Top with cheese mixture again.  Repeat the process until the cheese and cookies are done.

Chill in the refrigerator overnight.

Sprinkle with shifted unsweetened coco powder on the top.

DSC_5710 3 copy.jpg

Remove from the mold.  I use a square spring form pan this time, so it is really easy to do so.

DSC_5719 2 copy.jpg

Bon appétit!   O(∩_∩)O~

Popovers with blueberry jam

中文: 空心松饼

DSC_6006 3 copy.jpg

I wrote this popover recipe a couple years ago.  It was one of our favorite weekend breakfasts back then.   And now it is still our top choice for weekend breakfast. O(∩_∩)O~

Sometimes my husband volunteers to make these popovers.  So that you should know it simple and easy it is!

DSC_6027 2 copy.jpg

With a cup of freshly brewed coffee, sunny side up eggs and a few crispy bacon strips, this is a perfect Sunday brunch. 

Ingredients:

2 large eggs
1/2 teaspoon vanilla extract
1/2 cup whole milk
1/2 cup all purpose flour
1 teaspoon sugar
a pinch of salt
melted butter or oil spray for greasing the baking pan


Directions

You will need a popover pan for baking.  Muffin pan doesn’t work as well as popover pan.  Trust me; I tried. O(∩_∩)O~

Place the popover pan in the center of your oven. Preheat the oven to 425F/218C.  It is important that the pan is preheated too.

In a big cup or bowl, add all the ingredients.

DSC_5935 2 copy.jpg

With a hand blender, blend all ingredients together until the batter is runny and smooth.  If you don’t have a hand blender, a regular blender would work just as well.

DSC_5959 2 copy.jpg

Get the popover pan out of oven, spray or brush with oil or melted butter.

Pour the batter evenly and quickly.  Send back to oven and bake for 20 to 24 minutes or until popovers are puffy and golden brown.

DSC_5981 2 copy.jpg

It is fun to watch how they puff in the oven.

DSC_5999 2 copy.jpg

Serve immediately.  The moisture from inside of the popovers may make them mushy and chewy if you let them sit too long in the plate.

The recipe is for two people.  If you have more than two dining together, consider doubling the ingredients in the recipe.

We love to have the popovers with honey or jam.  They are so great together!

DSC_6012 3 copy.jpg

Lucky’s Steakhouse in Bay City, MI

The Lucky’s Steakhouse in Bay City is almost our go to place now.  Although we don’t live in Bay City, that doesn’t stop us dining there from time to time.

The following picture is from internet.

The interior décor is just so so.  But the service is always good.  Sometimes it can get very crowded.  The longest waiting record for us is over an hour.  That is pretty long waiting time for such a small town as Bay City.

Garlic bread for every table.  Well, not my favorite. 

I ordered a combo appetizer platter.

DSC_5393 2 copy.jpg

The ribs were great, tender and juicy.  The onion rings were hot and crunchy.

Our waiter was very considerate.  He brought extra plate for each dish so that my husband and I can share the food.

The potato fries were a really nice surprise.  Loved very bite until it was all gone!

DSC_5389 2 copy.jpg

House salad

DSC_5361 2 copy.jpg

My husband ordered Big Ribeye which is a huge 22 oz. prime cut of beef.  He asked for medium rare.

DSC_5393 2 copy.jpg

Now you see the reason why we like this steakhouse.  The steak is always cooked perfectly!

DSC_5414 2 copy.jpg

Hot and Spicy Duck Necks

If you are a hard core fan of Bizarre Food like me, you would probably have already heard or tried duck necks before.  They are a true delicacy and widely popular in China and maybe some other Asian countries too.

Because ducks constantly move their necks around, the meat from this part is lean and tender.  it is one of my favorites too.

DSC_4497 2 copy.jpg

Ingredients for braising duck necks

3 to 4 pounds duck necks
1 pot of “old soy sauce” *
1 clove of garlic
2 bay leaves
4 cloves
2 star anises
3 to 4 pieces of dried rhizome/ dried ginger slices
1/4 cup soy sauce
1 to 2 tablespoon dark soy sauce
2 to 3 tablespoons sugar
1/4 cup rice cooking wine
1 small piece of ginger root, crushed
1 teaspoon Sichuan peppercorns
1 handful dried chili peppers
1/2 teaspoon five spice powder
1/2 small cinnamon stick
1 teaspoon oyster sauce
1black cardamom pot
salt to taste
water for braising

(* An pot of “old soy sauce” is also called “old sauce”. It is the remaining braising sauce being boiled, filtered, covered tightly and kept in freezer.  Just like the “old dough” in pastry, the “old soy sauce” adds deeper, richer and better flavor to the braised meat.  A really good pot of “old soy sauce” may last years.)


seasonings

2 to 3 tablespoon chili oil sauce
2 tablespoon soy sauce
2 cloves of garlic, minced
1 tablespoon Sichuan peppercorn oil
1 teaspoon Sichuan peppercorns, toasted and ground
1 teaspoon sugar
1/4 teaspoon sesame oil
salt to taste

Directions:

The chili oil sauce is available in almost every Asian grocery store.  But I like to make my own version of chili oil sauce.

DSC_4771 2 copy.jpg

Remove any connective tissues on duck necks and rinse well under cold running water.

Blanch in boiling water for 5 to 8 minutes.  Drain well.

Put all spices needed except ginger for braising in a coffee filter paper.  If one is not big enough, use two pieces.

DSC_4336 2 copy.jpg

Tight it up

DSC_4342 2 copy.jpg

In a cast iron pot, add “old soy sauce”, spice bag, ginger, soy sauce, dark soy sauce, rice cooking wine, oyster sauce, salt and water.

Heat the cast iron pot over high heat until it boils.  Add duck necks.  Cover with lid and reduce the heat to simmer for about 60 minutes. If you like it more tender, extend the simmering time a bit longer.

DSC_4356 2 copy.jpg

Transfer the duck necks to a plate.  Cool down to room temperature.  Cover with plastic wrap and refrigerate for at least 2 hours.

DSC_4383 2 copy.jpg

With a sharp clever, chop the duck necks into 1 and 1/2 to 2 inches pieces.  Add chili oil sauce, soy sauce, minced garlic, Sichuan peppercorn oil, toasted and crushed Sichuan peppercorns, sugar, sesame oil and salt.  Mix well.

DSC_4482 2 copy.jpg
DSC_4458 3 copy.jpg

You can serve it now.  But the longer it sits, the better the flavor gets!  I usually make the dish ahead of time and let it sit for a couple hours before serving.

DSC_4511 2 copy.jpg

It goes so well with Michigan local beer!

DSC_4706 3 copy.jpg