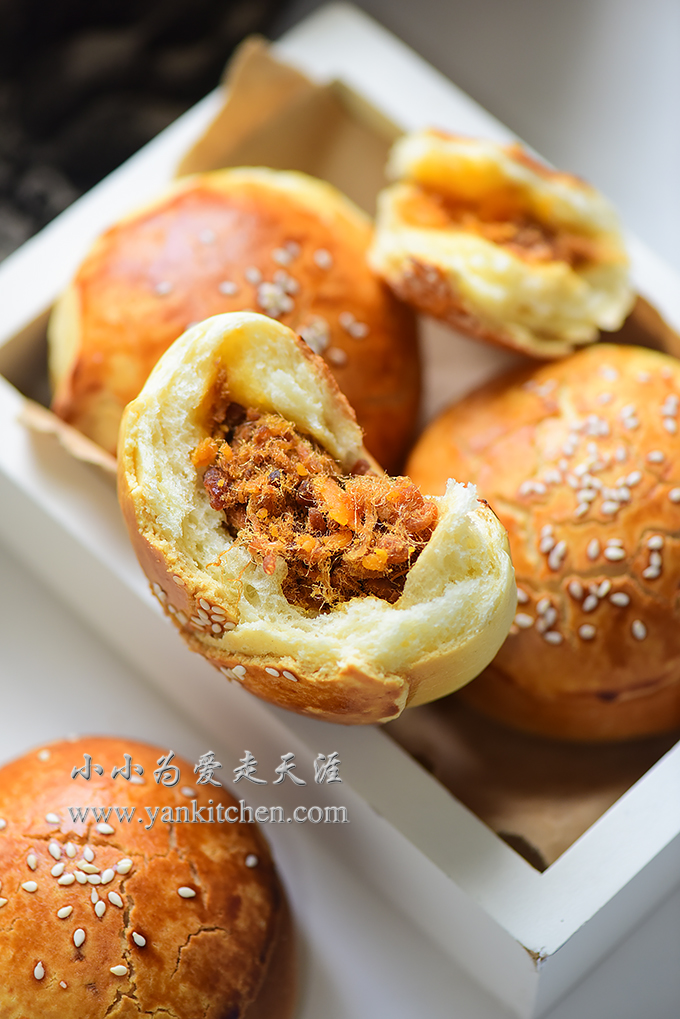
Dinner Rolls with Salted Egg Yolks and Pork Song (Dry Shredded Pork)

If you have been to an Asian bakery, you might have come across with some pork song buns.  Pork song is dry shredded pork which is made from pork that has been stewed, shredded, seasoned, slowly sautéed, and dried.   It is a long and slow process to make pork song.  That is also why it has such a nutty, delicate and rich flavor. 

Asian bakeries use pork song a lot.  If you have a chance to try it, just go ahead and have one.  You might instantly be hooked O(∩_∩)O~

Sometimes I love to bake pork song buns at home too. 

Ingredient s for the buns:

For the starter:

20 g all purpose flour
100 g water

For the dough:

380 g all purpose flour
1 1/2 teaspoons yeast
50 g granulated sugar
120 g milk
1 large egg
4 g salt
40 g butter, diced and softened under room temperature
egg wash and white sesame seeds for topping (optional)

For crispy toppings:

15 g egg
30 g butter, melted
50 to 60 g cake flour
10 g dry milk powder
30 g confectioner sugar


For pork song and salted duck egg yolks filling:

8 salted duck egg yolks
1 package of pork song (4 盎司,约112克)
3 to 4 tablespoons syrup

*** I posted before how to make salted duck eggs from scratch: https://www.yankitchen.com/english-blog/salted-duck-eggs .  Salted duck eggs and egg yolks are both available in most Asian grocery stores if you don’t want to wait that long.  Take a look at the package when you buy them from store.  Some are already cooked; some are not.  Buy the ones that have been cooked.  Otherwise, raw egg yolks need to be baked or steamed with a drizzle of rice cooking wine before adding to the filling.  ***

Directions:

In a small bowl, add 20 g flour.  Whisk while gradually adding 100 g water to the bowl.  Microwave the batter on high for 30 seconds.  Take it out, whisk again.  And then send back to the microwave for another 20 seconds.  Take it out; whisk; and send back to microwave for 15 seconds.  Repeat the process until you get a very thick batter.

Cover with plastic wrap.  The starter can be used right away when it cools down.  Or it can also be stored in fridge to be used on second day.

Add flour, dry milk powder, sugar and salt to a stand mixer bowl.  Whisk well. 

Add the starter, egg, milk.  Sprinkle the yeast on top.  Let it sit for 3 to 5 minutes.

Attach the dough hook to the stand mixer.  Knead at speed 2.

 When everything comes together to form a dough ball, add diced butter.

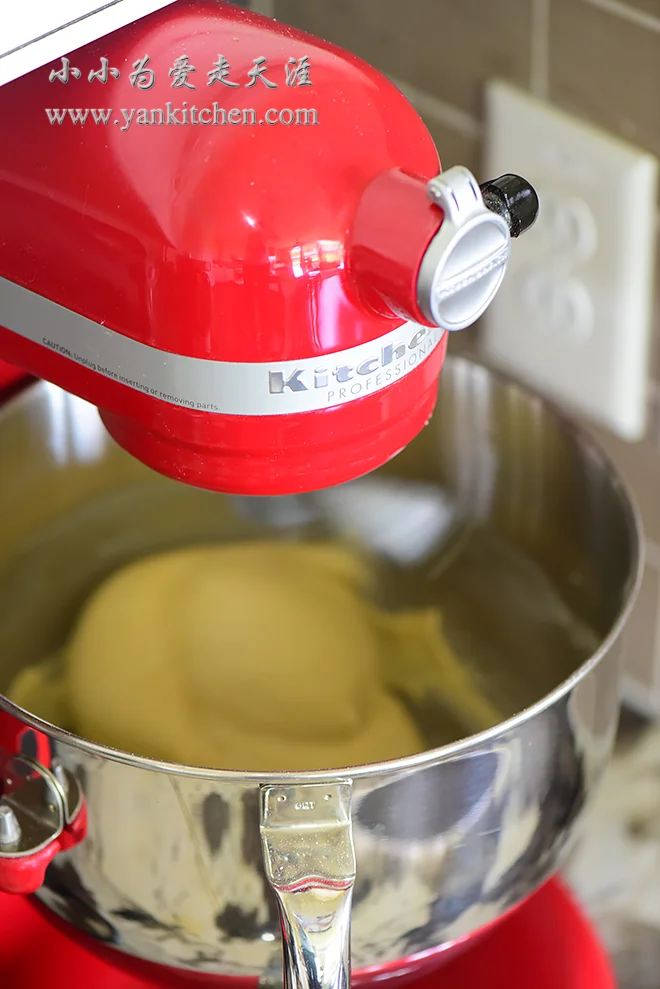
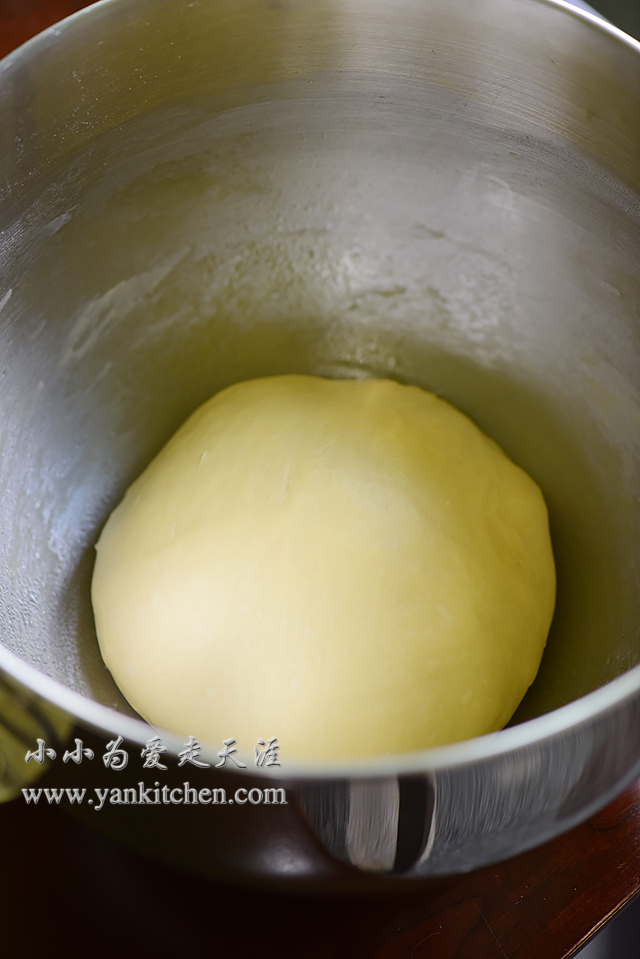
Continue to knead until the dough can pass window panel test. 

Cover with lid or plastic wrap.  Wait for about 60 minutes or until the dough doubles in its size.

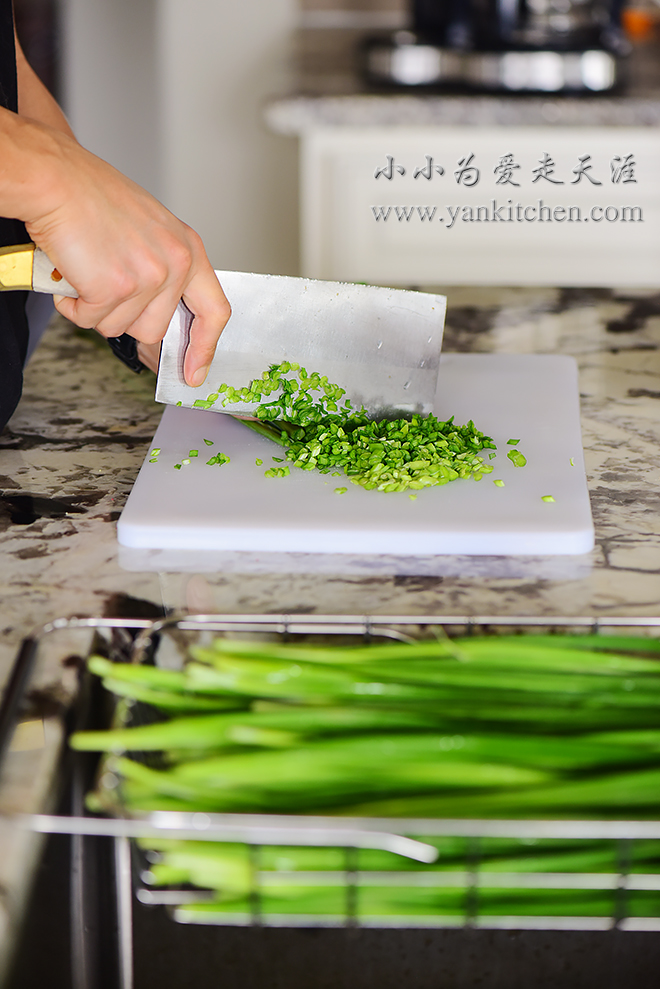
While waiting for the dough to rise, prepare the filling.

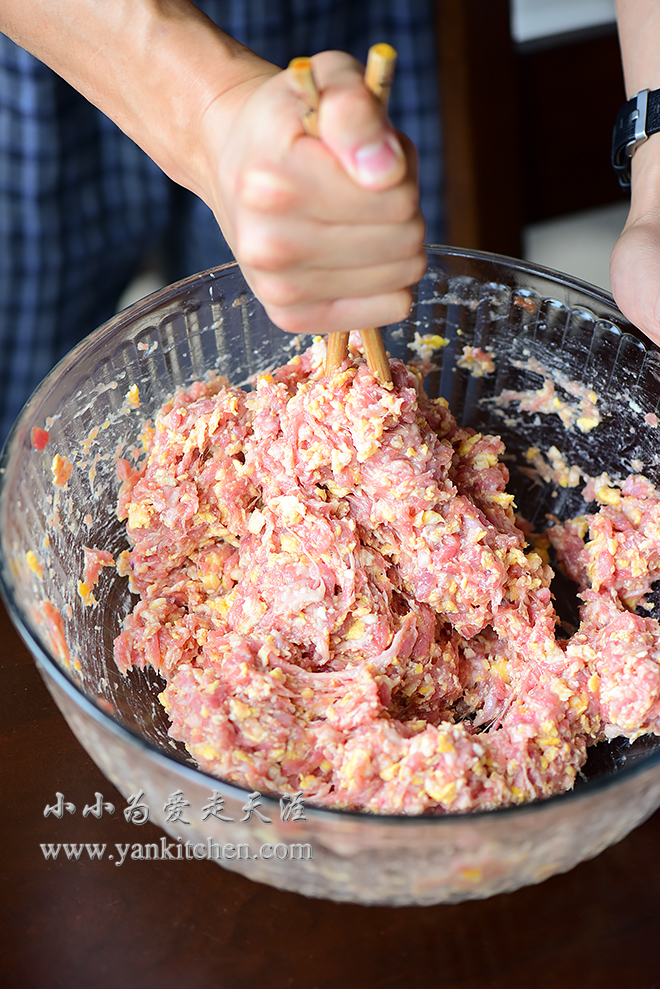
With a fork, crush the egg yolks.

Add pork song and syrup, mix well.

Transfer the dough to a large lightly dusted wooden board.  

Punch down and gently knead into a dough ball again.  Cover with plastic wrap and allow the dough to rest for another 10 minutes.

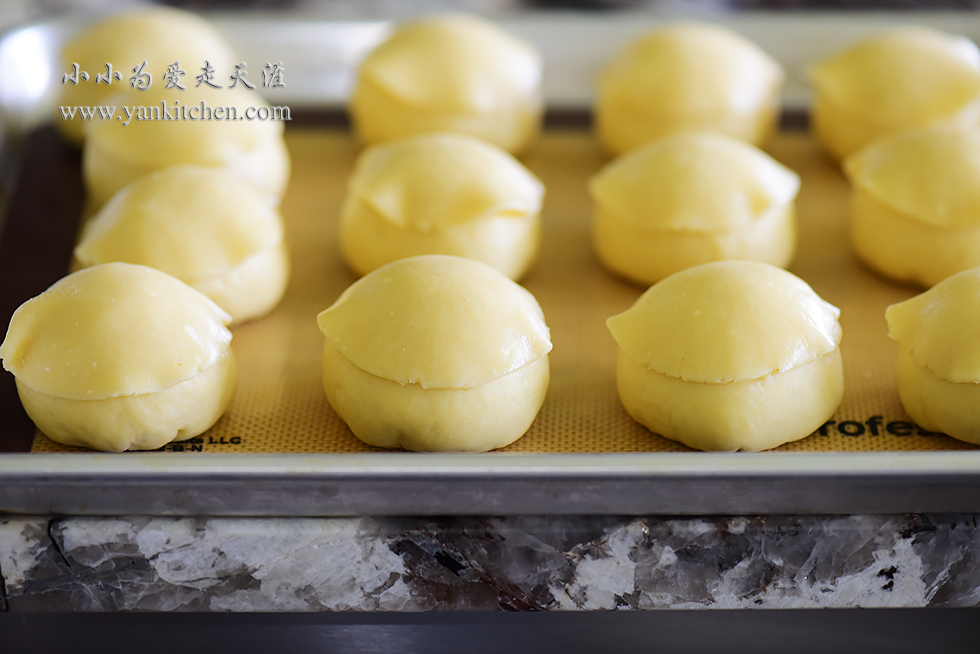
Divide the dough into 16 equal pieces.

With a small rolling pin, roll out each piece thin and flat.

Add filling.

Wrap up and shape each one into small round ball. 

Add to large baking pan.  Cover with plastic wrap and let them rest for another 20 to 30 minutes.

Add all ingredients for crispy toppings to a small bowl.  Whisk until everything is well combined together.  Refrigerate until it is totally chilled and hardened.

Divide into 16 pieces too.

With a small rolling pin, roll each piece thin and flat.  And add to the top of dinner rolls.

Brush each one with egg wash and then sprinkle with white sesame seeds.

Preheat oven to 400F/205C

Bake for 16 to 20 minutes, or until the rolls are golden brown.

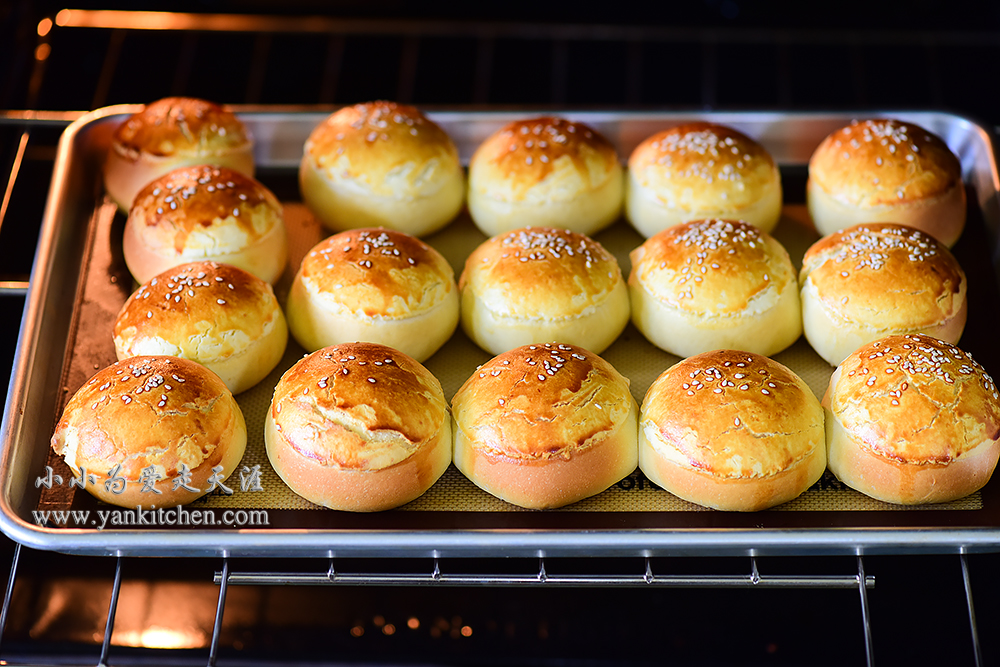
Piping hot and fresh out of the oven! O(∩_∩)O~

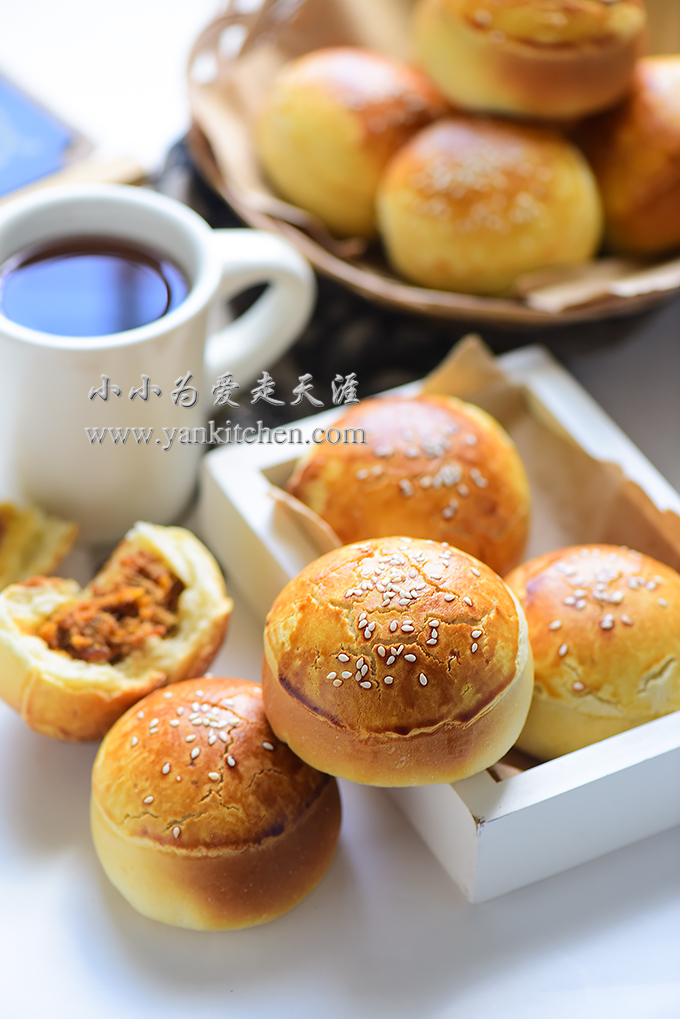
Shredded pork and salted duck egg yolks may sound like a bizarre combination.  It is sweet and savory, strange but in a good way.  Salted duck egg yolks have a rich fatty and nutty flavor.  When combined with pork song, that aroma is amplified.  No wonder this filling is a extremely hot trend in Asia countries for the last couple years O(∩_∩)O~

Natural Colorful Dumplings with Pork and Garlic Chive Filling

 中文菜谱: 天然彩色韭菜饺子

Garlic chive is a vegetable that is popular across Asia.  We use it in stir fries, soups, dumplings and various dim sums.  Surprisingly it never became popular in United States and never made their way to American grocery stores.  For those who are interested, there are two ways to get garlic chives.  You can either grow them yourself, or just drive to the nearest Asian grocery store.   Sometimes garlic chive is sold at local farmer market too.

Garlic chive tastes a lot like leek, but with a milder, more delicate grassy and earthy flavor.  The best season for garlic chive is spring.  After a long cold winter, garlic chive sprouts earlier than most vegetables.  Chinese people consider garlic chive to be a messenger of spring.  When summer comes, its flavor gets stronger and become less popular.

My favorite way to enjoy garlic chives is dumplings. 

All that beautiful colors come from vegetable purees, very natural and healthy.

Ingredients for dumpling wraps:

8 cups bread flour
spinach puree
beet puree
carrot puree
4 to 6 tablespoons vegetable oil
1 tablespoon salt
water


Add vegetable purees along with bread flour, salt, oil and water to three different mixing bowls.  Knead with hand until you have three smooth and elastic balls of dough.

Ingredients for pork and garlic chive filling:

2 pounds pork belly, grounded
4 eggs, lightly whisked
1 bunch garlic chives (weigh about 1 to 1.5 pounds)
2 to 4 tablespoons soy sauce
2 to 3 tablespoons rice cooking wine
2  to 3 tablespoons oyster sauce
1 tablespoon white ground pepper
1 to 2 teaspoons granulated sugar
1/2 teaspoon ground ginger
water/ chicken stock
salt to taste
1 to 2 tablespoons vegetable oil

Directions:

Heat a light weight cast iron wok over high heat.  Add 1 to 2 tablespoons vegetable oil.  Add eggs and gently scramble.  Remove from heat when done.

Add grinded pork along with soy sauce, rice cooking wine, oyster sauce, ground ginger, ground white pepper, and sugar to a large mixing bowl.  Whisk with a pair of chopsticks clockwise for several minutes.  Add some water/ chicken stock while whisking.

When pork mixture becomes sticky, add scrambled eggs.  Whisk until everything is well combined.

Rinse fresh garlic chives under running water and drain.

With a kitchen knife, finely chop the garlic chives.

Add to pork filling.  Drizzle a couple tablespoons vegetable oil on top. 

Whisk until everything well combined again.

The last step is to add salt to taste.

Use a large rolling pin to roll the dough into large flat pieces.  And then feed the dough through a stand mixer roller separately.

Gently lay down a layer of green dough on countertop.  Put a layer of yellow dough on top.

Add a layer of red one

Another layer of yellow one

Roll as tightly as possible

With a sharp knife, cut the roll into 1/4 inch thick pieces.

Look at that pretty pattern!

With a small rolling pin, roll each piece into thin flat dumpling wrappers.

Add about 2 tablespoons pork and garlic chive filling

Wrap it up

Dumplings line up on lightly dusted wooden boards

Add dumplings to a large pot of boiling water.

When the water boils again, add a cup of cold water. 

Repeat the process twice. 

Dipping sauce is made from soy sauce, vinegar, chili pepper sauce and a little bit of sugar.

Tasty O(∩_∩)O~

Freeze any extra dumplings and seal in a Ziploc bag.  They can be stored in freezer for up to 3 months.

I steam some dumplings later.  They are both pretty and tasty too.

Homemade Noodles in Thick Pork Broth

中文菜谱:

超浓猪筒骨汤面

Since I got stand mixer with pasta roller set and Philips pasta machine, I have been making a lot of noodles.  Homemade noodles from scratch is so much fun that the whole family can enjoy.

A bowl of great noodles depends on its broth, noodles and topping/ seasoning.  For the broth part, I personally love thick pork broth the most.  It is not hard to make at home but it will take hours.  After it is done, you will love it as much as I do. O(∩_∩)O~

Ingredients:

2 packages of pork femur bones (about 5 to 6 pounds; usually sold in meat department in most Asian grocery stores)
1 large piece ginger root, smashed with knife
2 tablespoons rice cooking wine
1/2 teaspoon ground white pepper 
2 to 3 star anises
2 bay leaves
3 to 4 pieces of dried ginger
water for cleaning and stewing
salt to taste


Directions:

Soak pork bones in cold water for an hour.  Change water twice in between

Rinse well under running cold water.

Fill a large cast iron pot with water.  Add pork bones. 

Cook over high heat until water boils.

Continue to cook on high for 5 minutes.  Get the bones out.  Discard the boiled water in the pot and clean pot with running water.

Refill the pot with water.  Cook over high heat again until water boils. 

Add bones, along with rice wine, ginger root, bay leaves, star anises and dried ginger.  Continue to cook over high heat for another 10 to 15 minutes when then water boils again.

Use a spoon to skim off crumbled blood bubbles that come to the top.

Cover with lid.  Reduce the heat to simmer for 5 hours.

I love to simmer, stew and braise with Staub cast iron pots.  The heat and cooking liquid are very evenly circulated and redistributed inside the pot, which is perfect for long hours’ slow cooking.

Here is a pot of thick pork broth.

Discard the spices added early.  Add salt and ground white pepper to taste.

When the broth is stewed, I make noodles.

Ingredients for noodles (serves two):

1 cup bread flour
1/4 cup water
a pinch of salt

In a medium bowl, add flour, water and salt.  Knead with hand until the dough is smooth and elastic.

Cover with plastic wrap.  Allow the dough to rest for 2 hours.

Transfer the dough to a light dusted wooden board.  With a large rolling pin, roll out the dough into 1/4 inch thick.

Feed the flat rolled dough sheet the stand mixer’s pasta roller.  It will further roll out the dough into long flat rectangle sheet.  I always set the thickness to 1 for this purpose.

Repeat the last step several times until the rectangle is very smooth, elastic and slightly shiny.

Adjust the thickness to 3. 

The thickness can be adjusted according to your own personal preference.

Change pasta roller to pasta cutter.  My favorite is the one that cuts sheet into spaghettis.  Feed the dough sheet through pasta cutter.

Noodles are thin and long.  They are firm but not tough; just the way I love. 

Our favorite vegetable to go with noodle is snow pea tips.

Cook the noodle in boiling water for about 45 seconds to 1 minute.

Add thick pork broth, blanched snow pea tips, soft boiled egg, and chili oil.  And then sprinkle with crash toasted peanut and chopped green onions.

Colorful Sweet Rice Cake Balls with Black Sesame Filling

The fifteen day of Chinese New Year is called Lantern Festival.  Lantern Festival Day is the last day of Chinese New Year celebration. On this day, we traditionally celebrate with lanterns and dance balls.  Families and friends get together to have another feast before going back to work. 

One of the traditional foods served on this feast is sweet rice cakes balls.  There are so many varieties of sweet rice cakes out there on the market that everyone can find his favorite flavor.  As for me, I love black sesame filling the most.  

It is not difficult to make them at home.  But I have been told many times that American people are not great fans of sticky sweet rice.  That is interesting.   If you are curious about rice cakes but don’t want to make them at home, go get one package in your local Asian grocery store.  They are sold in frozen food aisle.  The classic flavors are sesame, peanuts, red beans and jujube.

Ingredients for black sesames filling:

1 cup of raw black sesame seeds https://www.amazon.com/Kevala-Organic-Black-Sesame-Seeds/dp/B00LNNRUWY/ref=as_li_ss_tl?ie=UTF8&qid=1520084974&sr=8-5&keywords=raw+black+sesame+seeds&linkCode=ll1&tag=yankitchentext-20&linkId=59a37c67c59b1c60942ce13962e405de
1 firmly packed brown sugar
4 to 6 tablespoons butter
1/4 to 1/3 cup water


Directions:

There are roasted sesame seeds available.  But I always prefer raw ones and pan roast them at home myself.  Its flavor and scent are so much better and stronger.

Shift raw sesame seeds a couple times. 

Heat a cast iron skillet on medium heat.  Add black sesame seeds.  Pan roast for several minutes.  Stir with a whisk from time to time.

 I always add a pinch of white sesame seeds to the pan too.  When white sesame seeds are starting to change color to light creamy beige, I know they are done.

Allow roasted sesame seeds to cool down to room temperature.  Finely grind them in a coffee grinder

Turn off the heat.  Add ground black sesame

Mix everything until well combined

Refrigerate for at least 4 hours.  The sesame filling will be harden when chilled.

Divide the filling into small pieces and roll into tiny sesame balls. 

Send them back to fridge for later use

When waiting for the sesame filling to chill, I prepare five pieces natural colorful sweet rice cake dough.

They are in fact quite easy to make.  Just mix vegetable puree, water, a few drops of vegetable oil and sweet rice cake flour and knead. 

The purple color comes from purple sweet potato; red color comes from beet puree; yellow one is from carrot puree; green one is from spinach puree and the brown one is from coco powder.

Divide the dough into small pieces.  Press each piece flat; add black sesame filling; wrap it up and roll into sweet rice cake balls.

Fill a large pot with water.  Cook over high heat until the water boils.  Add sweet rice cake balls.

 Cook on high heat until sweet rice cake balls float.

The black sesame filling becomes runny when cooked.  Isn’t it cool? O(∩_∩)O~

Dried Purple Sweet Potatoes

中文菜谱:

紫薯干

Dried purple sweet potatoes are one of my favorite snacks.  Unfortunately it is very hard to find tasty ones available in store.  I usually make them from scratch at home.  It is so simple and easy that even a person who doesn’t cook can manage it in no time.  O(∩_∩)O~

After drying, the natural sweetness in sweet potatoes is concentrated and enlightened.  Dried sweet potatoes become soft but chewy in a very pleasant way.  It is kind of like eating gummy candies, but with intense sweet potatoes flavors.

There are several kinds of purple sweet potatoes available in the market.  I have two varieties here plus some regular yellow color ones.

Rinse them well under running water. 

Set up a vegetable steamer in a large stainless steel pan.  Add sweet potatoes to the steamer. 

Add water.  Heat over high heat until the water boils.  Reduce the heat to medium and continue to steam for another 30 to 40 minutes.  Time needed depends on the size of sweet potatoes.  Larger ones will take longer to cook through.

This is one of my favorite purple sweet potatoes.  Look at that gorgeous the color inside and out!

Here is another kind purple sweet potato

Peel all the sweet potatoes.  Cut them into long trips, and place them half inch apart from each other on dehydrator racks.

Set the dehydrator to 135F/ 57C

Dehydrate them in dehydrator for 8 to 9 hours.  Again, the actual time needed depends on the size of sweet potatoes and personal preference for their softness/ chewiness. 

Remove sweet potato strips from dehydrator.  Store them in a large Ziploc bag overnight or for at least a couple hours, which helps to redistribute moisture within sweet potatoes strips and they would taste much better.  

These are my favorite.  They are sweet, gorgeous and have the best combination of softness and chewiness. 

These purple sweet potatoes which come with white skins taste a bit dry and starchy.  They are good, but not great.

The yellow ones taste very much like the ones from my childhood.  Love them too.